Guests coming over in a half an hour and you need some new pillows to throw out fast? I've got you covered! ;) Okay, so probably no one is having throw pillow emergencies but I decided to call these 30 minute throw pillows because they are incredibly fast to make! I'm not the greatest seamstress so I have to do most of my sewing after my kids go to bed so they don't hear my colorful language. I'm kidding of course (kind of) but I do like to know if I can finish a project in one night and with these pillows the answer is yes! It's a great way to spend an evening, especially if you're a baseball playoffs widow like I am.
A few weeks ago we got new couches and I needed some new pillows to go with them. After looking for awhile and not finding what I wanted I decided to try making some! I bought this fabric and several others from Hobby Lobby and got to work. I was so excited with the results I decided to up my game for this blog post. First I took step by step photos and second I added a cool font to my picture. Both Neighbor Julia firsts! I'm finally catching up with the rest of you bloggers out there...so watch out! My readership is ready to shoot right up to 15 or 16!
But seriously, give these pillows a try! The possibilities are endless. Different Fabrics, differenct sizes, different holidays, etc. It's all straight lines and you flip right side out at the end so none of the seams are even visible. If I can do it, so can you! Have fun!
Thirty-Minute Throw Pillows
What you need (makes two 18" pillows):
1 yrd. thick durable fabric (I used patterned duck fabric from the home decor section)
1 large bag of pillow stuffing (I used ultra plush polyester fiber...pictured below)
thread to match your fabric (you'll use it in your machine but also to hand stitch the end closed)
fabric cutting mat and roller
How to do it:
Fold your fabric in half length wise with the printed side facing in. Using a rotary cutter, cut a square that is 18 1/2 in. by 18 1/2 in. (So now you'll have two squares facing each other...a front and back of a pillow that are already perfectly lined up)
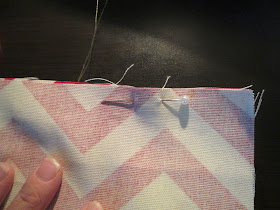
Pin fabric in place so that your corners all stay lined up.
Begin sewing fabric together making sure to back stitch about one inch at the beginning to make sure the corners will hold together. I actually back stitch two or three times at each corner just because I know my kids are going to be making forts out of these things and throwing them at each other. I made my seam about 1/4 in. from the edge of the fabric (so you'll end up with an 18 in. square pillow at the end). I tried to capture this in the photo...but when you come to a corner I usually stop while the needle is still through the fabric. Then just lift the guider foot up and rotate your fabric to the next side while the needle holds it in place. Now you're ready to sew the next side.
Continue sewing until you get to the last side. Finish sewing the last side leaving a 2 inch gap at the end of the pillow. Make sure to back stitch to prevent the thread from pulling out in the next step.
Using the 2 inch hole that you left in the pillow turn the fabric right side out. Gently push the fabric through the hole until it's totally right side out. Right now you may be cursing yourself for leaving such a small opening. But trust me...when it comes time to hand stitch it closed you'll be thanking me.
Lay the fabric out flat, making sure to fully extend the corners. Look it almost looks like a pillow now! You're so close!
Find your two inch gap again. and open it as wide as it will go.
Now it's time for stuffing the pillow! It's really easy but takes the most time of this whole process. This step can be best done while watching Call the Midwife or Gilmore Girls...just FYI. Above is a pic of what I used to fill my pillows. I highly recommend it!
Fill the pillow with the polyester fiber. You'll want to fill it more than you think it needs because over time it will lose some of its plushness. I used half of the bag for each pillow.
Now just hand stitch the corner up really well and you've got yourself a pillow! Congratulations! You did it! Now use the rest of your fabric and repeat the steps to make a matching set.


Love the steps and words in photo!
ReplyDeleteI Like your struggle. I also working in the 30 mint. For the assignment writing I taking help from the urgent assignment help service provider UK. Those provide the dissertation service in the reasonable price.
ReplyDeleteThis is an innovative product, I loved this, will be very useful for peoples who will use it. I am thinking to start any business after submitting my final PhD dissertation
ReplyDeleteA Dubai city tour package will take you to the heart of the Arabian Desert and reveal its beauty to you. You will be able to explore a variety of landscapes, such as sand dunes, mountains, canyons, oases and more.
ReplyDeleteThe Thirty Minute Throw Pillow" is a quick and easy DIY project that can add a pop of color and personality to any room. As a provider of Wordpress web design services, we understand the importance of aesthetics and personalization. This project is a great example of how simple changes can make a big impact on the overall look and feel of a space.
ReplyDelete